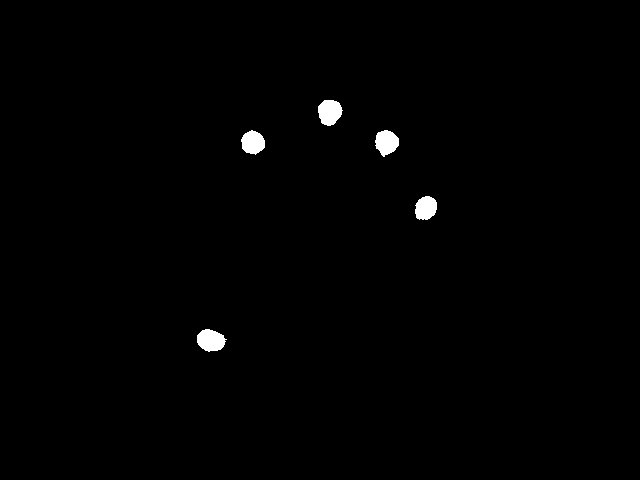
In this post I will discuss how you can capture and process images in preparation for blob detection. A future post will discuss the process of detecting and tracking blobs as well as fiducials, but here we are concerned with extracting clean binary images that will be passed to our detector module. We will use OpenCV's VideoCapture class to extract images from our capture device and then pass these images through a series of filters so that we end up with a binary image like below.
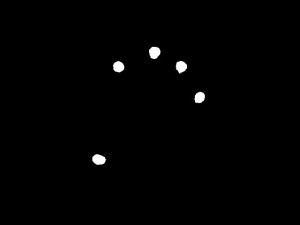
We will first declare a base class, cCapture, which will contain our VideoCapture instance (and device properties) and the captured frame. We will use the protected access modifier for the captured frame so that we have access to it in our derived class, cFilter.
#ifndef CAPTURE_H
#define CAPTURE_H

#include <opencv/cv.h>
#include <opencv/highgui.h>

class cCapture {
  private:
	bool capture_error;
	int device, width, height;
	cv::VideoCapture *cap;

  protected:
	cv::Mat capture_frame;

  public:
	cCapture(int device, int width, int height);
	~cCapture();

	void capture();

	cv::Mat& captureFrame();

	bool captureError();
};

#endif
In our definition of the cCapture class the constructor allocates a VideoCapture instance, checks for error, and sets the frame dimensions. The capture() method utilizes the extraction operator in the VideoCapture class to grab the frame and store it in a matrix object. We also define a captureFrame() method to return a reference to our captured frame for rendering purposes.
#include "capture.h"

cCapture::cCapture(int device, int width, int height) : capture_error(false), device(device), width(width), height(height) {
	cap = new cv::VideoCapture(device);
	capture_error = cap->isOpened() ? false : true;
	if (!capture_error) {
		cap->set(CV_CAP_PROP_FRAME_WIDTH, width);
		cap->set(CV_CAP_PROP_FRAME_HEIGHT, height);
	}
}

cCapture::~cCapture() {
	if (capture_error) return;
	delete cap;
}

void cCapture::capture() {
	if (capture_error) return;
	cap->operator>>(capture_frame);
}

cv::Mat& cCapture::captureFrame() {
	return capture_frame;
}

bool cCapture::captureError() {
	return capture_error;
}
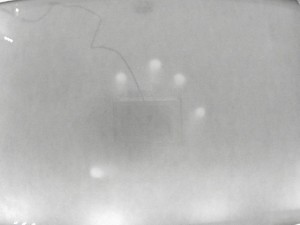
Below is a frame captured from a multi-touch table using the cCapture class. There are clearly some hot spots in this image that could be improved by better placement of our infrared modules, but we will attempt to balance this image in our derived class. If you are using this class, you may capture an image containing saturation. I am using a configuration script that uses the v4l2-ctrl command (Video4Linux2) to set the properties of my capture device. I've included that script further down.
We will now extend our cCapture class to apply our filters. Our cFilter class will process our captured image in four steps (three if we opt not to balance the image), so we have four matrix instances:
filter_framewill hold our gray scale conversiongaussian_framewill hold our smoothed image (thekernel_sizeandstd_devproperties apply to this frame)balance_framewill hold one state of thegaussian_frameso we can balance the image in all subsequent framesthreshold_framewill hold our clean binary image (theblock_sizeandcproperties apply to this frame)
#ifndef FILTER_H
#define FILTER_H

#include "capture.h"

class cFilter : public cCapture {
  private:
	bool filter_error, balance_flag;
	int kernel_size, block_size, c;
	double std_dev;

  protected:
	cv::Mat filter_frame, gaussian_frame, balance_frame, threshold_frame;

  public:
	cFilter(int device, int width, int height, int kernel_size, double std_dev, int block_size, int c);
	~cFilter();

	void filter();
	void balance(bool flag);

	cv::Mat& filterFrame();
	cv::Mat& gaussianFrame();
	cv::Mat& thresholdFrame();

	bool filterError();
};

#endif
In the definition of our cFilter object the constructor sets our properties, calls the constructor of the base class, and grabs the error generated by the base class. The filter() method grabs a frame, converts that frame to gray scale, applies a Gaussian blur with the specified kernel size and standard deviation (this will help to reduce the static prevalent in our final image by smoothing the image before our threshold method is applied), balances the frame (if our balance flag is set) by subtracting the stored balance from the smoothed image, and, finally, applies a locally adaptive thresholding method with the specifed block size and constant, c, to obtain our final binary image.
The balance() method sets our balance flag and, if the balance flag is set, captures a frame, converts it to gray scale, and applies a Gaussian blur storing the result in our balance_frame property.
Again, we define three methods, filterFrame(), gaussianFrame(), and thresholdFrame(), for rendering purposes.
#include "filter.h"

cFilter::cFilter(int device, int width, int height, int kernel_size, double std_dev, int block_size, int c) : filter_error(false),
													     balance_flag(false),
													     kernel_size(kernel_size),
													     std_dev(std_dev),
													     block_size(block_size),
													     c(c),
													     cCapture(device, width, height) {
	filter_error = captureError();
}

cFilter::~cFilter() {
}

// capture frame, convert to grayscale, apply Gaussian blur, apply balance (if applicable), and apply adaptive threshold method
void cFilter::filter() {
	if (filter_error) return;
	capture();
	cvtColor(capture_frame, filter_frame, CV_BGR2GRAY);
	GaussianBlur(filter_frame, gaussian_frame, cv::Size(kernel_size, kernel_size), std_dev, std_dev);
	if (balance_flag) absdiff(gaussian_frame, balance_frame, gaussian_frame);
	adaptiveThreshold(gaussian_frame, threshold_frame, 255, cv::ADAPTIVE_THRESH_MEAN_C, cv::THRESH_BINARY, block_size, c);
}

// capture frame, convert to grayscale, apply Gaussian blur --> this frame will be used in the filter method to balance the image before thresholding
void cFilter::balance(bool flag) {
	if (filter_error) return;
	balance_flag = flag;
	if (balance_flag) {
		capture();
		cvtColor(capture_frame, filter_frame, CV_BGR2GRAY);
		GaussianBlur(filter_frame, balance_frame, cv::Size(kernel_size, kernel_size), std_dev, std_dev);
	}
}

cv::Mat& cFilter::filterFrame() {
	return filter_frame;
}

cv::Mat& cFilter::gaussianFrame() {
	return gaussian_frame;
}

cv::Mat& cFilter::thresholdFrame() {
	return threshold_frame;
}

bool cFilter::filterError() {
	return filter_error;
}
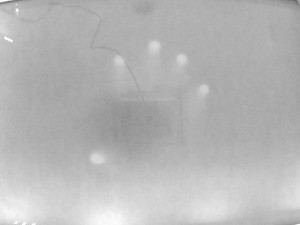
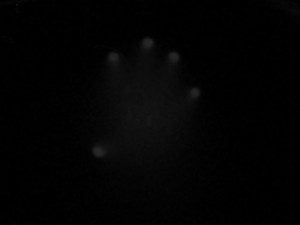
While rendering, we can see our image at different stages in the pipeline.


For rendering purposes we will declare four OpenGL helper functions to set up an orthogonal projection, generate a texture, delete a texture, and render a texture.
#ifndef GLHELPER_H
#define GLHELPER_H

#include <opencv/cv.h>
#include <GL/gl.h>

void setupOrtho(int width, int height);

void setupTexture(GLuint& texture);
void deleteTexture(GLuint& texture);
void renderTexture(GLuint texture, cv::Mat& ret, bool luminance, int width, int height);

#endif
Our renderTexture() function allows us to map an OpenCV matrix object to an OpenGL texture. In our call to this function we must specify a luminance flag for the pixel data format. Our captured image comes in as RGB, but the gray scale, smoothed, balanced, and binary images contain only luminance information.
#include "glhelper.h"

void setupOrtho(int width, int height) {
	glViewport(0, 0, width, height);
	glMatrixMode(GL_PROJECTION);
	glLoadIdentity();
	glOrtho(0.0f, width, height, 0.0f, -1.0f, 1.0f);
	glMatrixMode(GL_MODELVIEW);
	glLoadIdentity();
}

void setupTexture(GLuint& texture) {
	glEnable(GL_TEXTURE_2D);
	glGenTextures(1, &texture);
	glBindTexture(GL_TEXTURE_2D, texture);
	glTexParameterf(GL_TEXTURE_2D, GL_TEXTURE_WRAP_S, GL_CLAMP_TO_EDGE);
	glTexParameterf(GL_TEXTURE_2D, GL_TEXTURE_WRAP_T, GL_CLAMP_TO_EDGE);
        glTexParameteri(GL_TEXTURE_2D, GL_TEXTURE_MIN_FILTER, GL_LINEAR);
        glTexParameteri(GL_TEXTURE_2D, GL_TEXTURE_MAG_FILTER, GL_LINEAR);
}

void deleteTexture(GLuint& texture) {
	glDeleteTextures(1, &texture);
}

void renderTexture(GLuint texture, cv::Mat& ret, bool luminance, int width, int height) {
	glColor4f(1.0f, 1.0f, 1.0f, 1.0f);
	glEnable(GL_TEXTURE_2D);
	glBindTexture(GL_TEXTURE_2D, texture);
	glTexImage2D(GL_TEXTURE_2D, 0, GL_RGBA, ret.cols, ret.rows, 0, luminance ? GL_LUMINANCE : GL_BGR, GL_UNSIGNED_BYTE, ret.data);
	glBegin(GL_QUADS);
	glTexCoord3f(0.0f, 0.0f, 0.0f); glVertex3f(0.0f,  0.0f,   0.0f);
	glTexCoord3f(1.0f, 0.0f, 0.0f); glVertex3f(width, 0.0f,   0.0f);
	glTexCoord3f(1.0f, 1.0f, 0.0f); glVertex3f(width, height, 0.0f);
	glTexCoord3f(0.0f, 1.0f, 0.0f); glVertex3f(0.0f,  height, 0.0f);
	glEnd();
}
In our main() function we instantiate our filter and initialize SDL. We set up an orthogonal projection and generate a texture before entering our event loop. Once inside the loop we capture key down events. f and b toggle full screen and balance mode, respectively, and keys 1-4 toggle which stage in the pipeline we are rendering.
#include <SDL/SDL.h>

#include "src/filter.h"
#include "src/glhelper.h"

// capture parameters
static const int CDEVICE = 0;
static const int CWIDTH  = 640;
static const int CHEIGHT = 480;

// filter parameters
static const int    FKERNELSIZE = 7;    // for gaussian blur
static const double FSTDDEV     = 1.5;
static const int    FBLOCKSIZE  = 47;   // for adaptive threshold
static const int    FC          = -5;

// display (native resolution of projector)
static const int WIDTH  = 640; //1280
static const int HEIGHT = 480; //800
static const int BPP    = 32;

//////////////////////////////////////////////////////////////////////////////////////////////////////////////////////////////////////////////// main
int main(int argc, char *argv[]) {
	bool active = true, balance = true, fullscreen = false;
	int render = 0;

	cFilter filter(CDEVICE, CWIDTH, CHEIGHT, FKERNELSIZE, FSTDDEV, FBLOCKSIZE, FC);
	filter.balance(balance);

	SDL_Init(SDL_INIT_EVERYTHING);
	SDL_Surface *screen = SDL_SetVideoMode(WIDTH, HEIGHT, BPP, (fullscreen ? SDL_FULLSCREEN : 0) | SDL_HWSURFACE | SDL_OPENGL);
	SDL_Event event;

	setupOrtho(WIDTH, HEIGHT);
	glClearColor(0.0f, 0.0f, 0.0f, 0.0f);

	GLuint texture;
	setupTexture(texture);

	while (active) {
		while (SDL_PollEvent(&event)) {
			switch (event.type) {
			case SDL_QUIT:
				active = false;
				break;
			case SDL_KEYDOWN:
				switch (event.key.keysym.sym) {
				case SDLK_f:			// toggle fullscreen
					fullscreen ^= true;
					screen = SDL_SetVideoMode(WIDTH, HEIGHT, BPP, (fullscreen ? SDL_FULLSCREEN : 0) | SDL_HWSURFACE | SDL_OPENGL);
					break;
				case SDLK_b:			// toggle balance
					balance ^= true;
					filter.balance(balance);
					break;
				case SDLK_1:			// captured frame
					render = 0;
					break;
				case SDLK_2:			// filtered frame
					render = 1;
					break;
				case SDLK_3:			// gaussian blur
					render = 2;
					break;
				case SDLK_4:			// adaptive threshold
					render = 3;
					break;
				}
				break;
			}
		}

		filter.filter(); // capture, filter, blur, (balance), threshold

		switch (render) {
		case 0:
			glClear(GL_COLOR_BUFFER_BIT);
			renderTexture(texture, filter.captureFrame(), false, WIDTH, HEIGHT);
			break;
		case 1:
			glClear(GL_COLOR_BUFFER_BIT);
			renderTexture(texture, filter.filterFrame(), true, WIDTH, HEIGHT);
			break;
		case 2:
			glClear(GL_COLOR_BUFFER_BIT);
			renderTexture(texture, filter.gaussianFrame(), true, WIDTH, HEIGHT);
			break;
		case 3:
			glClear(GL_COLOR_BUFFER_BIT);
			renderTexture(texture, filter.thresholdFrame(), true, WIDTH, HEIGHT);
			break;
		}

		SDL_GL_SwapBuffers();
	}

	deleteTexture(texture);

	SDL_Quit();

	return 0;
}
The Makefile used to compile and link this project is below.
all: main.cc lib/capture.o lib/filter.o lib/glhelper.o
	g++ main.cc lib/capture.o lib/filter.o lib/glhelper.o -o bin/main -L/usr/lib `sdl-config --cflags --libs` `pkg-config opencv --cflags --libs` -lGL

lib/capture.o: src/capture.h src/capture.cc
	g++ src/capture.cc -c -o lib/capture.o

lib/filter.o: lib/capture.o src/filter.h src/filter.cc
	g++ src/filter.cc  -c -o lib/filter.o

lib/glhelper.o: src/glhelper.h src/glhelper.cc
	g++ src/glhelper.cc -c -o lib/glhelper.o

clean:
	@rm -f *~ src/*~ lib/* bin/*
The configuration script for setting our device properties follows. This script may need to be modified for your particular capture device. Executing v4l2-ctl --list-ctrls will enumerate the controls available for your device.
#!/bin/sh

#                     brightness (int)  : min=0 max=255 step=1 default=8 value=0
#                       contrast (int)  : min=0 max=255 step=1 default=32 value=37
#                            hue (int)  : min=0 max=255 step=1 default=165 value=143
#             auto_white_balance (bool) : default=0 value=0
#                    red_balance (int)  : min=0 max=255 step=1 default=128 value=128
#                   blue_balance (int)  : min=0 max=255 step=1 default=128 value=128
#                       exposure (int)  : min=0 max=255 step=1 default=255 value=20
#                       autogain (bool) : default=1 value=0
#                      main_gain (int)  : min=0 max=63 step=1 default=20 value=20
#                          hflip (bool) : default=0 value=0
#                          vflip (bool) : default=0 value=0
#                      sharpness (int)  : min=0 max=63 step=1 default=0 value=0

v4l2-ctl --list-ctrls

v4l2-ctl --verbose --set-ctrl=brightness=0
v4l2-ctl --verbose --set-ctrl=contrast=64
v4l2-ctl --verbose --set-ctrl=auto_white_balance=1
v4l2-ctl --verbose --set-ctrl=exposure=120
v4l2-ctl --verbose --set-ctrl=auto_gain=1
v4l2-ctl --verbose --set-ctrl=main_gain=20
v4l2-ctl --verbose --set-ctrl=hflip=1
v4l2-ctl --verbose --set-ctrl=vflip=0
v4l2-ctl --verbose --set-ctrl=light_frequency_filter=0
v4l2-ctl --verbose --set-ctrl=sharpness=0
Now that we have generated a clean binary image from our capture source, we can pass it off to our detector module. In my next post we'll attempt to use cvBlobsLib to detect our blobs, and we'll set up a method for tracking them temporally and converting them to events to be processed by our system.
If you found this post useful or you have any comments, questions, or suggestions, leave me a reply.
Download this project: filter.tar.bz2

Comments
Hi,
I am trying to achieve same thing as you described above, Can you please tell me little about your setup in terms of Hardware. What type of camera are you using ? Did you make any modification in camera filter ? Can i achieve same thing using regular RGB camera ?.
My device camera capturing frame that in turn converted to greyscale and later i apply gaussian and threshold filter .
Thanks
Himanshu
Author
Hey Himanshu.. the box I used is basically a Rear Diffused Illumination setup. It is a box with a piece of acrylic on top with a piece of grey rear projection material laid on the acrylic. Inside the box I had a bunch of infrared LED strips to illuminate the interior with infrared radiation.
The camera I used was this one (placed inside the box)..
http://www.environmentallights.com/led-infrared-lights-and-multi-touch/infrared-cameras/13171-ir850-flat-camera-7pack.html
That particular camera has an 850nm band pass filter to filter out the visible wavelengths and allow the IR through.
You can do some projects with an RGB camera, but if you intend to lay a projection on the screen, the light from the visible spectrum will interfere with your blob detection. Separating the radiation between the visible and infrared spectra allows you to separate output from input.
I'm not sure if that is clear enough. Let me know if I can clarify anything.
This is great effort, I am trying to do the same but could not achieved this. Please guide which opencv version you are using and which version of Visual Studio you build it from.
Please reply...
Thank You
Author
Hey Arslan..
I just compiled/linked it against a build of OpenCV 2.4.4 without any issues.
This project isn't using Visual Studio. The GNU compiler and linker is used to build this project as it stands. You'll need to somehow set up your build environment in Visual Studio based on the
Makefilein the project download. I'm not very familiar with Visual Studio, so I don't have much advice for you in that regard.Let me know if you have any specific questions related to the build. I might be able to give you some pointers.
Keith thanks for reply, let me try this on GNU compiler. I will back to you after trying. If you have any suggestion, please do share.
Thank You
Regards:
Arslan
hey,
I downloaded the project, but I guess you didn't add the sdl.h header file.
I main.cc file you used the sdl.h header file..
Author
Hey gunjan,
SDL.h is part of the libsdl1.2-dev package on Debian. You could do a..
sudo apt-get install libsdl1.2-devIt should compile once you've installed the package.
I am working on multi touch table as my final year engineering project.
I'm having problem in calibrating the code with the input .
so will u please send me an upload link,so that I can upload my code.
I want your suggestions on it.
Thanks...
How did you calibrate the camera.?
Pingback: Motion Detection | P P M
Hi Keith,
This looks like great work! Are you still active on this? I’m trying to setup a multi touch table using Linux and am having some trouble. Do you have any guidance on the proper setup of Linux, opencv, and SDL to make this work now? I’m new to Linux and have tried several setups and keep getting various errors.
Thanks in advance for any guidance you can provide.